官方要求是:Docker Engine + Docker Compose v2
构建镜像时至少建议 2 GB RAM
创建宿主机持久化目录[1]
## 替换yourdir为自己的目录
mkdir -p /yourdir/openclaw-docker
mkdir -p /yourdir/openclaw-docker/config
mkdir -p /yourdir/openclaw-docker/workspace
sudo chown -R 1000:1000 /yourdir/openclaw-docker/config /yourdir/openclaw-docker/workspace
cd /yourdir/openclaw-docker
生成随机 token 和 keyring 密码
openssl rand -hex 32
openssl rand -hex 32
把这两串值记下来,后面分别填到:
OPENCLAW_GATEWAY_TOKENGOG_KEYRING_PASSWORD
创建 .env
官方 Docker 文档当前支持直接使用官方远程镜像 ghcr.io/openclaw/openclaw:latest
cat > .env <<'EOF'
OPENCLAW_IMAGE=ghcr.io/openclaw/openclaw:latest
OPENCLAW_GATEWAY_TOKEN=这里替换成你第一个随机值
OPENCLAW_GATEWAY_BIND=lan
OPENCLAW_GATEWAY_PORT=18789

OPENCLAW_CONFIG_DIR=/yourdir/openclaw-docker/config
OPENCLAW_WORKSPACE_DIR=/yourdir/openclaw-docker/workspace

GOG_KEYRING_PASSWORD=这里替换成你第二个随机值
XDG_CONFIG_HOME=/home/node/.openclaw
EOFGOG_KEYRING_PASSWORD:给 OpenClaw/GOG 的密钥环或凭据存储使用的密码,应该随机且保密。XDG_CONFIG_HOME:Linux/XDG 约定里的配置目录基准路径。
创建docker-compose.yml
cat > docker-compose.yml <<'EOF'
services:
  openclaw-gateway:
    image: ${OPENCLAW_IMAGE}
    restart: unless-stopped
    env_file:
      - .env
    environment:
      - HOME=/home/node
      - NODE_ENV=production
      - TERM=xterm-256color
      - OPENCLAW_GATEWAY_BIND=${OPENCLAW_GATEWAY_BIND}
      - OPENCLAW_GATEWAY_PORT=${OPENCLAW_GATEWAY_PORT}
      - OPENCLAW_GATEWAY_TOKEN=${OPENCLAW_GATEWAY_TOKEN}
      - GOG_KEYRING_PASSWORD=${GOG_KEYRING_PASSWORD}
      - XDG_CONFIG_HOME=${XDG_CONFIG_HOME}
      - PATH=/home/linuxbrew/.linuxbrew/bin:/usr/local/sbin:/usr/local/bin:/usr/sbin:/usr/bin:/sbin:/bin
    volumes:
      - ${OPENCLAW_CONFIG_DIR}:/home/node/.openclaw
      - ${OPENCLAW_WORKSPACE_DIR}:/home/node/.openclaw/workspace
    ports:
      - "127.0.0.1:${OPENCLAW_GATEWAY_PORT}:18789"  #禁止ip访问
    command:
      [
        "node",
        "dist/index.js",
        "gateway",
        "--bind",
        "${OPENCLAW_GATEWAY_BIND}",
        "--port",
        "18789",
        "--token",
        "${OPENCLAW_GATEWAY_TOKEN}",
        "--allow-unconfigured"
      ]
EOF
拉取官方镜像并启动
docker pull ghcr.io/openclaw/openclaw:latest
docker compose up -d
docker compose ps
远程连接
因为我们使用的是OPENCLAW_GATEWAY_BIND=lan所以必须要allowedOrigins
在配置文件里面写
cat > /yourdir/openclaw-docker/config/openclaw.json <<'EOF'
{
  "gateway": {
    "controlUi": {
      "dangerouslyDisableDeviceAuth": true,
      "allowedOrigins": [
        "https://openclaw.example.com"
      ]
    }
  }
}
EOF
如果遇到遇到 pairing required
去服务器运行
docker compose exec openclaw-gateway openclaw devices list
## 直接下面一条批准就行了,上面list有问题再去看
docker compose exec openclaw-gateway openclaw devices approve --latest
配置
model
我这里用的是中转站
docker compose exec openclaw-gateway openclaw configure◇ Where will the Gateway run?
│ Local (this machine)
│
◇ Select sections to configure
│ Model
│
◇ Model/auth provider
│ Custom Provider
│
◇ API Base URL
│ {你用的中转站}
│
◇ How do you want to provide this API key?
│ Paste API key now
│
◇ API Key (leave blank if not required)
│ {你的api key}
│
◇ Endpoint compatibility
│ OpenAI-compatible
│
◇ Model ID
│ gpt-5.2
│
◇ Verification successful.
│
◇ Endpoint ID
│ xwang (全英文,随便写,标识,例如模型的选择就是xwang/gpt-5.2)
│
◇ Model alias (optional)
│ GPT-5.2web_search
openclaw有两个网页搜索,一个是 web_search,一个是 web_fetch,其中web_search是需要api key的,web_fetch是不需要的。其余的都是要收费的。
所以这里我都不用,后面会安装skill。
channel
飞书
经过我几次安装后发现,这个官方镜像的飞书插件居然是不可用的,虽然是自带的,但是一配置一启动就报错,看日志:docker compose logs --tail=200
用下面的命令补全依赖就行了
docker compose exec -u root openclaw-gateway sh -c "cd /app/extensions/feishu && npm config set registry https://registry.npmmirror.com && npm install @larksuiteoapi/node-sdk"注意:docker compose restart 不会丢失依赖,docker compose down 因为会移除容器,会丢失依赖。
飞书端
-
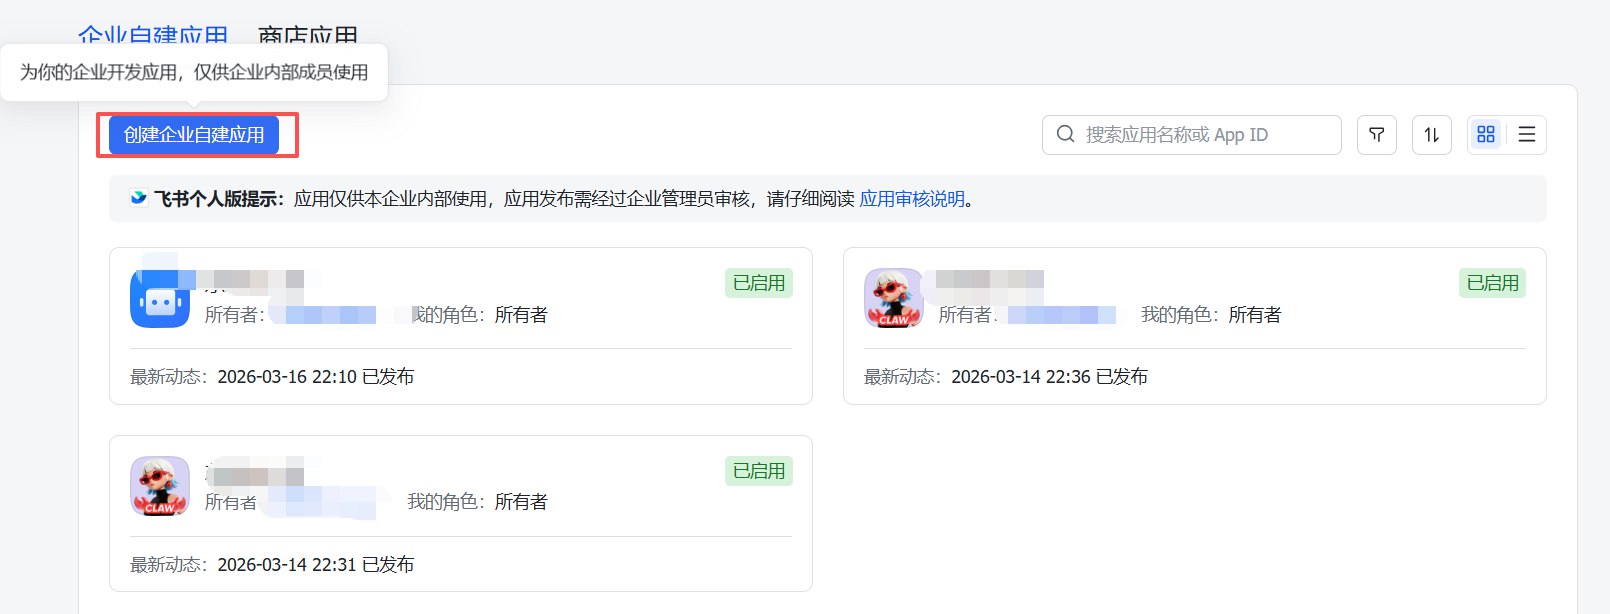
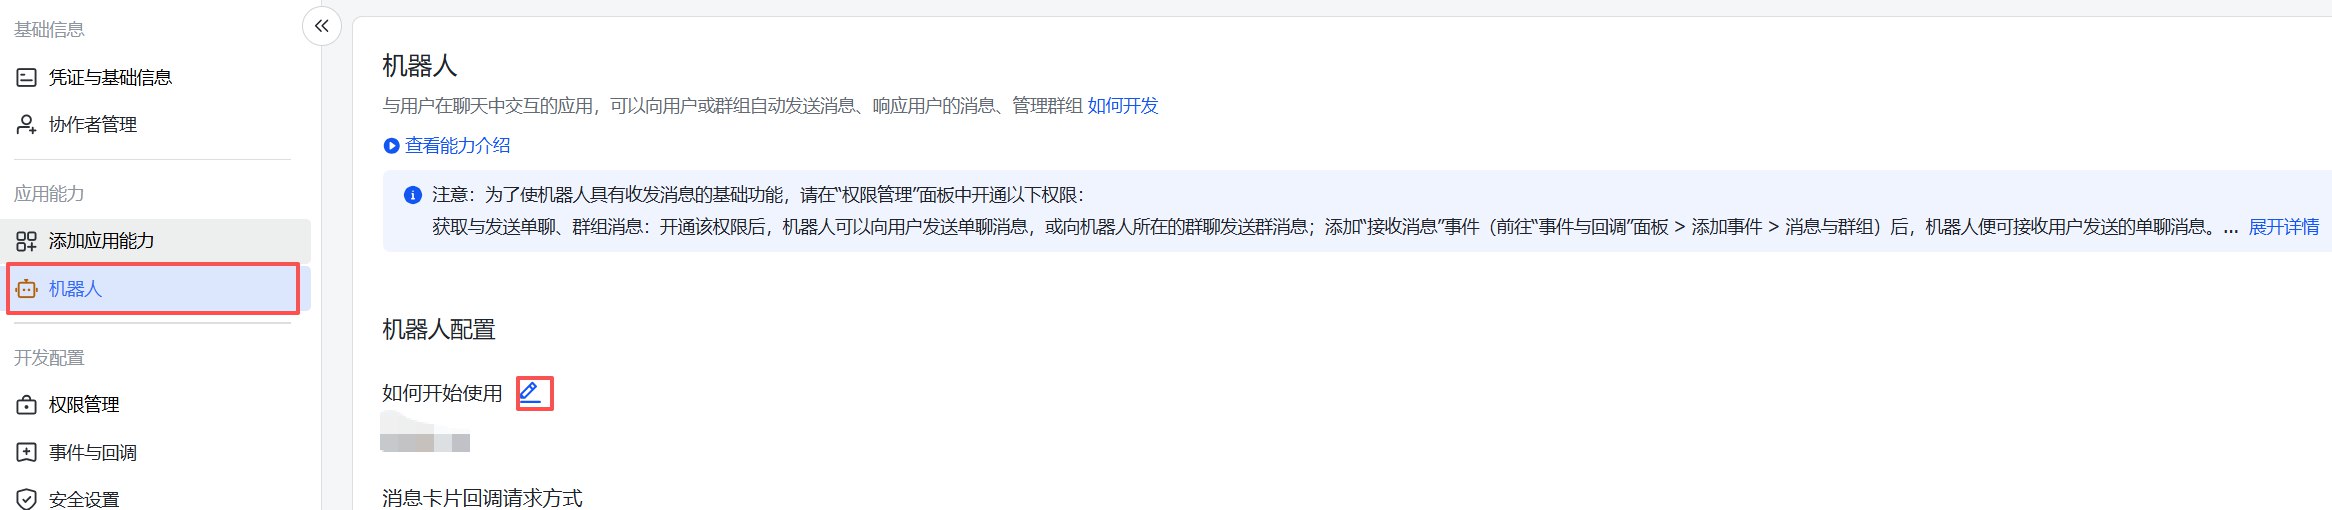
需要创建一个飞书机器人

-
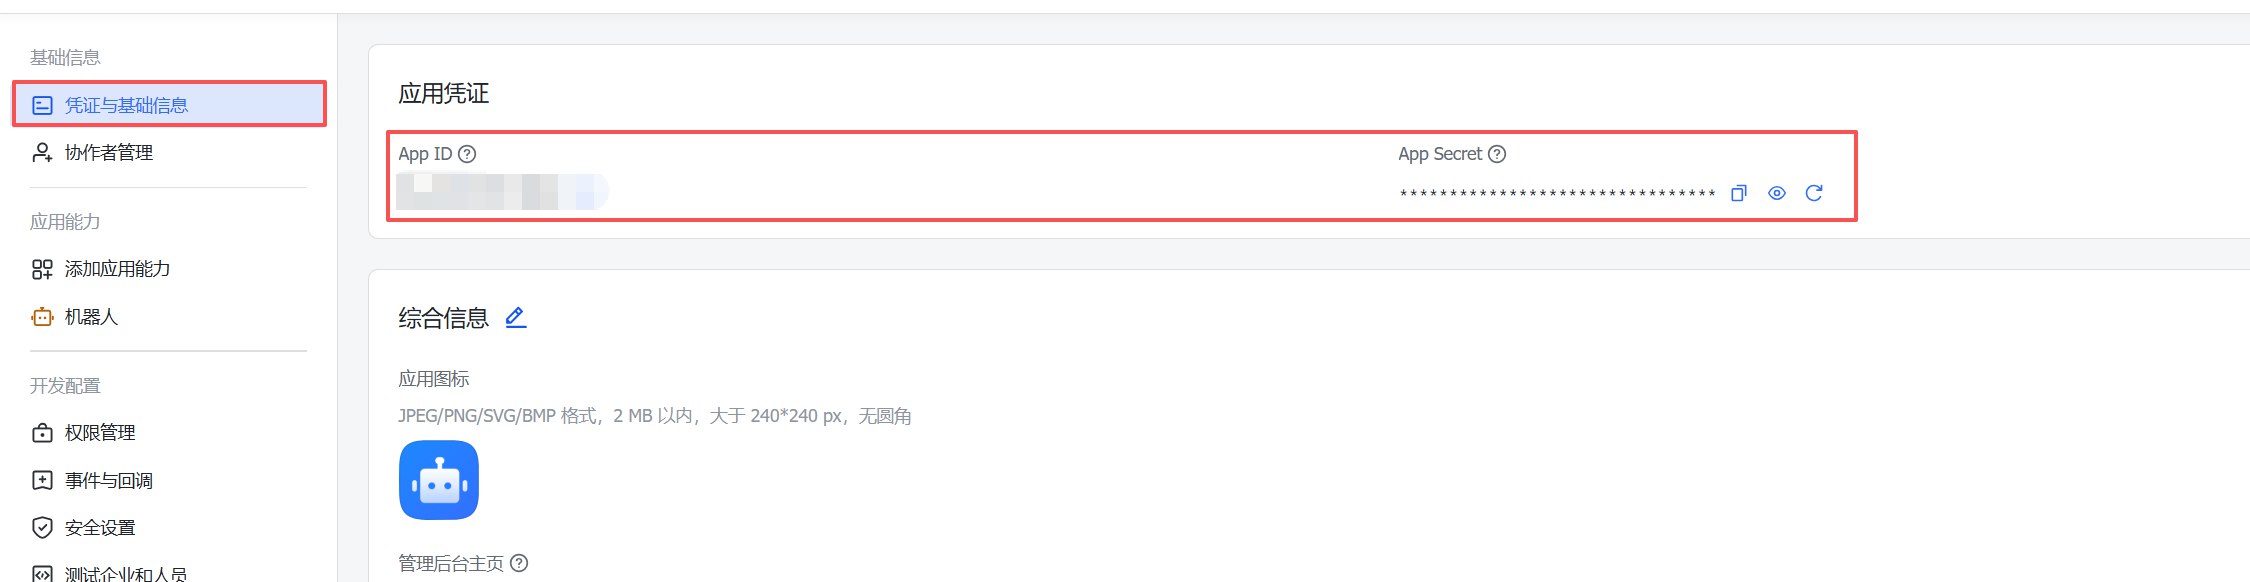
复制凭证
-
配置权限
{ "scopes": { "tenant": [ "aily:file:read", "aily:file:write", "application:application.app_message_stats.overview:readonly", "application:application:self_manage", "application:bot.menu:write", "cardkit:card:read", "cardkit:card:write", "contact:user.employee_id:readonly", "corehr:file:download", "event:ip_list", "im:chat.access_event.bot_p2p_chat:read", "im:chat.members:bot_access", "im:message", "im:message.group_at_msg:readonly", "im:message.p2p_msg:readonly", "im:message:readonly", "im:message:send_as_bot", "im:resource" ], "user": ["aily:file:read", "aily:file:write", "im:chat.access_event.bot_p2p_chat:read"] } } -
启用机器人功能并设置名字
-
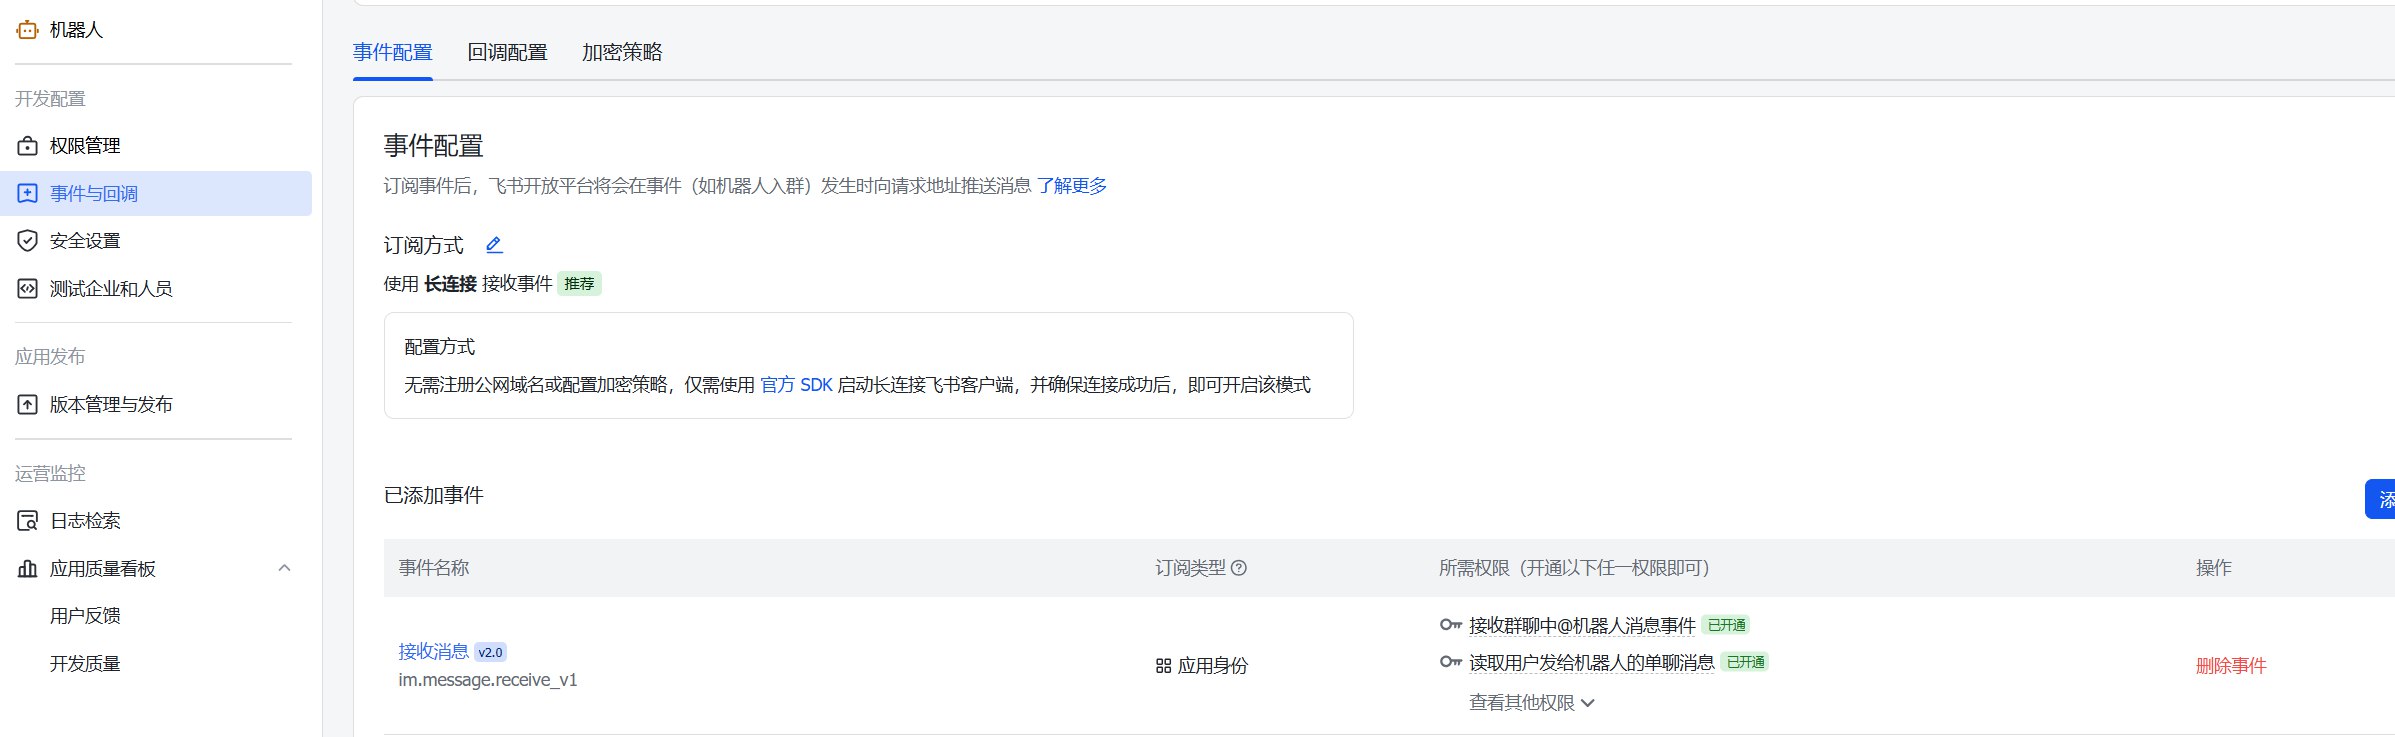
配置事件订阅
⚠️ 重要提示: 在设置活动订阅前,请确保:
- 你已经为 Feihu 添加了
openclaw 频道 - 网关正在运行(
openclaw 网关状态)
活动订阅 :
-
选择使用长连接以接收事件 (WebSocket)
-
新增事件:
im.message.receive_v1
⚠️ 如果网关未运行,长连接设置可能会无法保存。
- 你已经为 Feihu 添加了
-
发布应用

openclaw端
查看feishu插件的情况
docker compose exec openclaw-gateway openclaw plugins info feishu如果是error,用上面命令安装依赖
跟着向导
docker compose exec openclaw-gateway openclaw channels add接着添加你的app id和app secret,还有方式选择websocket
绑定agent到main
◇  How do you want to provide this App Secret?
│  Enter App Secret
│
◇  Enter Feishu App Secret
│  你的App Secret
│
◇  Enter Feishu App ID
│  你的App ID
◇  Configure DM access policies now? (default: pairing)
│  No
│
◇  Add display names for these accounts? (optional)
│  No
│
◇  Bind configured channel accounts to agents now?
│  Yes
│
◇  Route feishu account "default" to agent
│  main (default)
在第一次发送消息的时候,机器人会说不行要配对
输入批准配对就行了
docker compose exec openclaw-gateway openclaw pairing approve feishu <CODE>telegram
docker compose exec openclaw-gateway openclaw channels add选择telegram,之后输入token,完成后在telegram bot处对话会收到和上面一样的配对码消息,之后进行配对即可。
agent
创建新agent,可以自己换名字
docker compose exec openclaw-gateway openclaw agents add feishu-bot把飞书绑定到这个agent
docker compose exec openclaw-gateway openclaw agents bind --agent feishu-bot --bind feishu把 main 上原来的飞书解绑
docker compose exec openclaw-gateway openclaw agents unbind --agent main --bind feishu重启并检查
docker compose restart
docker compose exec openclaw-gateway openclaw agents list --bindings
docker compose exec openclaw-gateway openclaw channels status --probe
配置文件(参考)
model
"models": {
    "mode": "merge",
    "providers": {
      "my_custom_provider": {
        "baseUrl": "https://api.your-proxy-domain.com/v1",
        "apiKey": "sk-xxxxxxxxxxxxxxxxxxxxxxxxxxxxxxxx",
        "api": "openai-responses",
        "models": [
          {
            "id": "gpt-5.4",
            "name": "GPT-5.4",
            "reasoning": true,
            "input": [
              "text",
              "image"
            ],
            "cost": {
              "input": 1.75,
              "output": 14,
              "cacheRead": 0.175,
              "cacheWrite": 0
            },
            "contextWindow": 1000000,
            "maxTokens": 128000
          }
          // 可以在这里继续添加其他模型...
        ]
      }
    }
  }
注意:如果是国内中转站,为了防cc攻击,通常会加上如下的鉴权
如有需要加在api下面,同一级别,具体规则看你的中转站!这里只做模板
"headers": {
    "User-Agent": "curl/8.0"
},
"authHeader": true,
web
"tools": {
    "profile": "full",
    "allow": [
      "group:web"
    ],
    "web": {
      "search": {
        "enabled": false
      },
      "fetch": {
        "enabled": true
      }
    }
  }
profile默认是messaging,意思就是只能聊天full就是能力全开,但是通过allow白名单控制,这里就是把联网搜索功能开启了而已。
agent&bind
"agents": {
    "defaults": {
      "model": {
        "primary": "my_custom_provider/gpt-5.4"
      },
      "models": {
        "my_custom_provider/gpt-5.4": {
          "alias": "GPT-5.4"
        }
      },
      "workspace": "/home/node/.openclaw/workspace",
      "compaction": {
        "mode": "safeguard"
      }
    },
    "list": [
      {
        "id": "main"
      },
      {
        "id": "my-feishu-bot",
        "name": "my-feishu-bot",
        "workspace": "/home/node/.openclaw/workspace/my-feishu-bot",
        "agentDir": "/home/node/.openclaw/agents/my-feishu-bot/agent"
      }
    ]
  },
  "bindings": [
    {
      "type": "route",
      "agentId": "my-feishu-bot",
      "match": {
        "channel": "feishu"
      }
    }
  ]